I would like to know the pros and cons of this design strategy.
Basically grooves or chines are part of the base.
As in this design:
http://www.bestkiteboarding.com/2010-Spark
I think the difficulty would be in glassing the base.
Grooves or chines in the base.
-
JMF
- Frequent Poster
- Posts: 493
- Joined: Mon Sep 02, 2002 1:00 am
- Brand Affiliation: None
- Location: Teahupo'o, Tahiti
- Has thanked: 4 times
- Been thanked: 0
Re: Grooves or chines in the base.
Remember these boards are what we call pop outs. That is they are formed in a mould in a one shot process. So getting these types of intricate designs are not easy. Not saying it cant be done at home just takes a little more effort. You would form it in a two shot process. I would vacuum bag core and bottom layup and weight it down my my rocker table to get some sort of rocker set in. Then layup core with bottom layup on rocker table and vacuum my top layer.
Last edited by JMF on Thu Jan 26, 2012 3:26 pm, edited 1 time in total.
-
Bille

- Very Frequent Poster
- Posts: 4026
- Joined: Sun Sep 04, 2011 5:37 pm
- Local Beach: Lake Mohave
- Gear: Ozone Edge
- Brand Affiliation: Barz Optics
Jaybar Dynabar V7 - Has thanked: 252 times
- Been thanked: 189 times
Re: Grooves or chines in the base.
How about "This" ; try the Reciprocal of that strategy ?JMF wrote: ...
You would form it in a two shot process. I would vacuum bag core and bottom layup and weight it down my my rocker table to get some sort of rocker set in. Then layup core with bottom layup on rocker table and vacuum my top layer.
Since --flyyboy-- wants the Grooves or chines in the base, then make the
rocker-table convex instead of concave, and lay-up the Top & the core first.
Now Ya got a stabilized core temporarily glued to your table, so shaping the
grooves in the base would easier.
For Bagging the skin, i would go with Lighter weight glass & use More of them
to get the final weight needed ; making the glass job in the now concave Grooves
on the base of the board even easier.
Also -- if your core wants to be tapered and thinner on the tips then calculate
that into the dimensions of the table and place tapered guides on both sides of the
core for final shaping.
How to get the final shape on the rail will Need more coffee ?
Getting a sharp edge where the Grooves meet the base is also a problem
that needs working out. When Ya lay-up the bottom skins ; they will get rounded.
This is a GOOD problem !
Bille
-
BWD
- Very Frequent Poster
- Posts: 3849
- Joined: Thu Jun 05, 2003 3:37 am
- Has thanked: 2 times
- Been thanked: 81 times
Re: Grooves or chines in the base.
I recommend 4 oz glass.
It helps.
Also, don't make the grooves sharp -glass won't take it unless you are a wizard.
Make it a bit rounded, and sand into a thick hot coat of resin to sharpen the edge as needed.
Not sharp enough? add a bit more resin, and sand into it with a hard sanding block until you are satisfied.
Doesn't really need to be that sharp imho, and it will be weaker that way as well....
-
Bille
- Very Frequent Poster
- Posts: 4026
- Joined: Sun Sep 04, 2011 5:37 pm
- Local Beach: Lake Mohave
- Gear: Ozone Edge
- Brand Affiliation: Barz Optics
Jaybar Dynabar V7 - Has thanked: 252 times
- Been thanked: 189 times
Re: Grooves or chines in the base.
& ALSO :BWD wrote:I recommend 4 oz glass.
It helps.
Also, don't make the grooves sharp -glass won't take it unless you are a wizard.
Make it a bit rounded, and sand into a thick hot coat of resin to sharpen the edge as needed.
...
Leave the Last layer of glass off, then add the sharpened edges,as per --BWD--
Then :
A nice layer of 3oz crows-foot glass would do fine for the Last one ; it wouldn't
need to be vacuumed down ,as it conforms to edges well.
Bille
-
JMF
- Frequent Poster
- Posts: 493
- Joined: Mon Sep 02, 2002 1:00 am
- Brand Affiliation: None
- Location: Teahupo'o, Tahiti
- Has thanked: 4 times
- Been thanked: 0
Re: Grooves or chines in the base.
Although I have yet to try that when I made my table I made sure I had enough play to do just that, work from top up so to speak in reverse. In theory it most certainly could work you would just need to be sure that your base is squared up and level and that you have your rocker calculations dialed in. One thing you would be sacrificing would be any sort of concave unless you pre-shaped that into the core of course, could be a real test of your shaping abilityBille wrote:How about "This" ; try the Reciprocal of that strategy ?JMF wrote: ...
You would form it in a two shot process. I would vacuum bag core and bottom layup and weight it down my my rocker table to get some sort of rocker set in. Then layup core with bottom layup on rocker table and vacuum my top layer.
Since --flyyboy-- wants the Grooves or chines in the base, then make the
rocker-table convex instead of concave, and lay-up the Top & the core first.
Now Ya got a stabilized core temporarily glued to your table, so shaping the
grooves in the base would easier.
For Bagging the skin, i would go with Lighter weight glass & use More of them
to get the final weight needed ; making the glass job in the now concave Grooves
on the base of the board even easier.
Also -- if your core wants to be tapered and thinner on the tips then calculate
that into the dimensions of the table and place tapered guides on both sides of the
core for final shaping.
How to get the final shape on the rail will Need more coffee ?
Getting a sharp edge where the Grooves meet the base is also a problem
that needs working out. When Ya lay-up the bottom skins ; they will get rounded.
This is a GOOD problem !
Bille
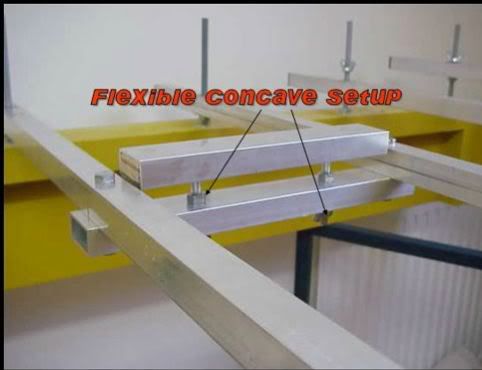
My table is totally flexible from tip to tip and my vacuum comes from four points on the table that assure I have somewhat of an even vacuum around the whole table. That system is made up of a network of flexible Festo components...... and car tyre valves believe it or not
-
Bille
- Very Frequent Poster
- Posts: 4026
- Joined: Sun Sep 04, 2011 5:37 pm
- Local Beach: Lake Mohave
- Gear: Ozone Edge
- Brand Affiliation: Barz Optics
Jaybar Dynabar V7 - Has thanked: 252 times
- Been thanked: 189 times
Re: Grooves or chines in the base.
--JMF-- I Kinda see Why/How, you were able to do 42kts VMAX over the water with a kite;JMF wrote: ...
One thing you would be sacrificing would be any sort of concave unless you pre-shaped that into the core of course, could be a real test of your shaping ability
My table is totally flexible from tip to tip and my vacuum comes from four points on the table that assure I have somewhat of an even vacuum around the whole table.
...
you analyze problems well !!
On the concave thing :
I watched a wind-surfer shaper do this ; after he got the bottom flat to his specks, he
marked the apex where the concave met the bottom for each groove & placed 1/2" wide
tape over them so as Not to destrou the lines with his sandpaper.
Then he marked the center of the concave and the depth,(which changed along it's length)
Then
He made tapered guides on his table-saw & taped them down for each side of his router
to run on.
Next
He placed a 1/4" thick movable guide for the side of his router, to get a straight line.
So --
all he had to do was run the router the length of his board at the deepest setting down the
center of his concave, & move the edge guide and readjust the bit depth for the next
run and so on, till he only cut almost nothing as he approached the sides for his concave.
Now he has a bunch of 1/8" wide router grooves marking the bottom of his concave, so
he runs a felt-tip marker on the bottom of each and breaks out his hand shaping equipment.
***
Another way would be to make a curved sanding block matching the radious of your concave
with sides that you can run down the length of the board on your tapered guides. Just use 3M-77 to glue the sandpaper to your sanding block. Start with 50g then keep getting finer. I use This one "A Lot" !!
Run "layers" of tape on your guides for the heavier grit paper,to make-up for the different
thickness in the sandpaper, so the final is Not deeper than anticipated.
***
On your Vacuum table ; for an Aircraft quality part :
I usually place peel-ply on the side where the Bag goes..
Then i place a breather blanket or( Baby blanket) ON TOP of the Peel-ply, then
the vacuum bag goes over everything.
click on the pic here to see what it looks like,( i've seen couch stuffing material
at Wall-mart, that looks similar) it's made of polyester :
http://www.jamestowndistributors.com/us ... her+Fabric
This accomplishes TWO things :
1) it distributes the vacuum evenly over the entire part
2) you can now make your ((fiber / resin)) content 50/50 or 100g of resin
for each 100g of fiber and it will saturate your carbon or glass to wet-out very fast;
((this is WAY too much resin)) would make the part Brittle !!
Next
use the blue shop towels & place toilet paper inside to blot out any major excess resin,
be careful here -- you can blot out Too much real fast, making the part weak !
Don't let the toilet paper touch the part !
Here is where the baby blanket comes into play. Any excess resin will pass Through
the Peel-ply and get absorbed into the baby blanket, during the vacuum stage . Your
part will end up with the PERFECT amount of fiber/resin ratio for Ultimate strength capable
of the fibers chosen !!!
Do "NOT" let that breather material touch the part !!
There "Must" be Peel-ply between the part & the baby blanket,(ask me how i know this) ?
Fricken sanded Two Hours to get that resin soaked SH*T off my part !!!
With the peel-ply between the part & the breather material ; it comes
off easily.
Bille
-
JMF
- Frequent Poster
- Posts: 493
- Joined: Mon Sep 02, 2002 1:00 am
- Brand Affiliation: None
- Location: Teahupo'o, Tahiti
- Has thanked: 4 times
- Been thanked: 0
Re: Grooves or chines in the base.
Shaping concave into core is totally doable. Like you mentioned Surf board shapers have been doing it for decades. Problem with us is the material size we work with is so much smaller in size it's critical that when doing concave by hand you've already done your homework and have a plan of action. With Surfboards if you make a mistake there usually enough meat to correct mistakes and take it down a level. With a 15-20 mm core obviously less. Must say I don't think I'd like to take on that challenge.
On my table the concave comes from a half round piece of aluminum strip that goes under the plexiglass deck. Have not had time to make the adjustable concave block that pushes up from the bottom/middle of the table pretty simple to do. Now reverse this idea and do it from the top somehow? To much effort IMO
On my table the concave comes from a half round piece of aluminum strip that goes under the plexiglass deck. Have not had time to make the adjustable concave block that pushes up from the bottom/middle of the table pretty simple to do. Now reverse this idea and do it from the top somehow? To much effort IMO
Who is online
Users browsing this forum: No registered users and 162 guests